Crazy Crust Berry Pie – The Easy & Irresistible Dessert You’ll Love
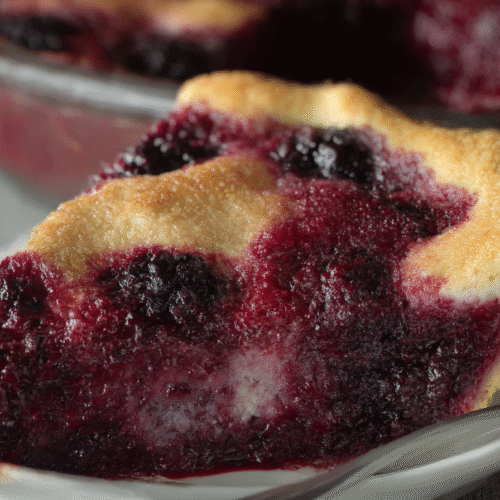
If you’ve ever craved a homemade pie but dreaded the hassle of rolling, chilling, and carefully arranging pie dough, this Crazy Crust Berry Pie is going to change the way you think about baking pies. Unlike traditional pies, where you start with a prepared crust, this recipe creates its own crust as it bakes. It’s like a kitchen magic trick—pouring in a simple batter and then topping it with berries, only to have it transform into a golden, tender crust that hugs the juicy filling.
This recipe is especially perfect for busy weeknights, last-minute entertaining, or when you’re craving comfort food without the stress. With just a handful of ingredients and minimal prep, you can bring a bakery-worthy dessert to the table in under an hour. Plus, it’s versatile enough to work with fresh or frozen berries, making it a year-round treat.
For more easy and family-favorite desserts, don’t miss my Blueberry Coffee Cake recipe, which pairs perfectly with a hot cup of tea or coffee.
Why You’ll Love Crazy Crust Berry Pie
- Self-making crust: No rolling pins, no fuss. The batter forms its own crust while baking.
- Customizable: Use blueberries, raspberries, blackberries, strawberries, or a mix.
- Simple ingredients: You likely have most of these pantry staples on hand already.
- Quick baking time: Just mix, pour, and bake—ready in under 45 minutes.
- Perfect texture: Buttery edges, tender base, and juicy, spiced berries on top.
Ingredients
- For the Crust
- ½ cup 113 g unsalted butter, softened
- ⅓ cup 67 g granulated sugar
- 1 large egg
- ¼ teaspoon salt
- 1 teaspoon baking powder
- 1 cup 124 g all-purpose flour
- ¾ cup water
- For the Filling
- 3 cups frozen berries thawed and drained well (fresh can be used too)
- ⅓ cup 67 g granulated sugar
- ½ teaspoon cinnamon
- 1 tablespoon 8 g cornstarch
- For Serving Optional
- Whipped cream or vanilla ice cream
Instructions
- Preheat the oven
- Set oven to 375°F (190°C). Grease a 9-inch pie plate.
- Prepare the crust
- In a medium bowl, cream butter and sugar together until light and fluffy.
- Beat in egg, salt, and baking powder.
- Mix in flour until combined. Stir in water to form a thin batter.
- Assemble the filling
- In a separate bowl, combine berries, sugar, cinnamon, and cornstarch. Toss gently until berries are coated.
- Assemble the pie
- Pour the crust batter into the prepared pie plate—it will be thin.
- Spoon berry mixture evenly over the batter. The crust will bake up around the fruit.
- Bake
- Bake for 40–50 minutes, until the crust is golden brown and set.
- Cool for 15 minutes before slicing.
- Serve
- Top slices with whipped cream or ice cream if desired.
Notes
- Make sure berries are well-drained to avoid excess liquid in the pie.
- You can use a mix of blueberries, raspberries, strawberries, or blackberries.
- Best enjoyed the same day, but leftovers keep covered in the fridge for up to 3 days.
Ingredients You’ll Need
For the Crust
- ½ cup (113g) unsalted butter, softened
- ⅓ cup (67g) granulated sugar
- 1 large egg
- ¼ teaspoon salt
- 1 teaspoon baking powder
- 1 cup (124g) all-purpose flour
- ¾ cup water
For the Filling
- 3 cups frozen berries, thawed and well-drained (or fresh berries)
- ⅓ cup (67g) granulated sugar
- ½ teaspoon cinnamon
- 1 tablespoon (8g) cornstarch
Optional for Serving
- Whipped cream or vanilla ice cream
Step-by-Step Instructions
Step 1: Prepare the Oven and Pan
Preheat your oven to 350°F (175°C). Lightly grease a 9-inch pie pan or baking dish.
Step 2: Mix the Crust Batter
In a large mixing bowl, cream together the softened butter and sugar until light and fluffy. Beat in the egg, followed by the salt and baking powder. Gradually mix in the flour and water until a smooth batter forms. This batter will look more like cake batter than pie dough, and that’s exactly what you want.
Step 3: Make the Berry Filling
In another bowl, combine the thawed (or fresh) berries, sugar, cinnamon, and cornstarch. Toss gently until the berries are evenly coated. The cornstarch will help thicken the berry juices as they bake.
Step 4: Assemble the Pie
Pour the crust batter into the prepared pan and spread it evenly. Spoon the berry mixture over the top, distributing it as evenly as possible. Don’t worry if the batter and filling look separate—the magic happens in the oven.
Step 5: Bake
Place the pie in the oven and bake for 40–45 minutes, or until the crust is golden brown and set. The edges should look slightly crisp, while the center remains tender.
Step 6: Cool and Serve
Allow the pie to cool for at least 15 minutes before serving. This rest period helps the crust firm up and the filling set slightly. Serve warm with whipped cream or a scoop of vanilla ice cream for the ultimate indulgence.

Pro Tips for the Best Results
- Drain frozen berries well: Too much liquid will make the crust soggy. If your berries release extra juice, pat them dry before using.
- Add lemon zest: A teaspoon of lemon zest brightens the flavor and balances the sweetness.
- Mix fruit varieties: Try a combination of raspberries, blueberries, and blackberries for more depth of flavor.
- Serve warm: This pie is best enjoyed warm out of the oven with a creamy topping.
Variations to Try
- Peach Crazy Crust Pie: Swap the berries for sliced peaches and add a pinch of nutmeg.
- Apple Version: Use thinly sliced apples with cinnamon and a touch of brown sugar.
- Cherry Pie: Substitute berries with pitted cherries for a classic flavor.
- Gluten-Free Option: Replace the all-purpose flour with your favorite gluten-free baking blend.
What to Serve with Crazy Crust Berry Pie
Pair your pie with:
- Whipped cream for light sweetness.
- Vanilla ice cream to balance the warm berries.
- Coffee or tea for an afternoon treat.
- Lemon drizzle for a refreshing twist.
Storage Instructions
- Room Temperature: Keep loosely covered for up to 1 day.
- Refrigerator: Store in an airtight container for up to 4 days.
- Freezer: Wrap individual slices tightly in plastic wrap and freeze for up to 2 months. Reheat in the oven before serving for best results.
FAQs About Crazy Crust Berry Pie
1. Can I use fresh berries instead of frozen?
Yes, fresh berries work beautifully in this recipe. Just make sure to wash and dry them thoroughly.
2. Do I need to thaw frozen berries first?
Yes. Thaw and drain well before mixing, otherwise the crust may not bake properly.
3. Can I reduce the sugar?
Absolutely—if your berries are naturally sweet, you can reduce the sugar by 1–2 tablespoons.
4. How do I know when the pie is done?
The crust will be golden brown, and the edges will look slightly crisp. You can also insert a toothpick near the edge—it should come out clean.
5. Can I double the recipe?
Yes, bake it in a 9×13-inch pan instead of a pie dish, and increase the baking time slightly.
Nutrition Facts (per slice, based on 8 servings)
- Calories: 240
- Fat: 10g
- Saturated Fat: 6g
- Cholesterol: 45mg
- Sodium: 130mg
- Carbohydrates: 35g
- Fiber: 3g
- Sugars: 20g
- Protein: 3g
Conclusion
This Crazy Crust Berry Pie is a dessert that truly lives up to its name—it’s crazy simple, crazy delicious, and crazy versatile. By letting the crust bake itself, you eliminate one of the trickiest parts of pie-making, while still enjoying a dessert that feels comforting and homemade. Whether you’re hosting guests, baking with kids, or just treating yourself, this recipe is sure to become a staple in your kitchen. Try it once, and you’ll find yourself coming back to it again and again.


