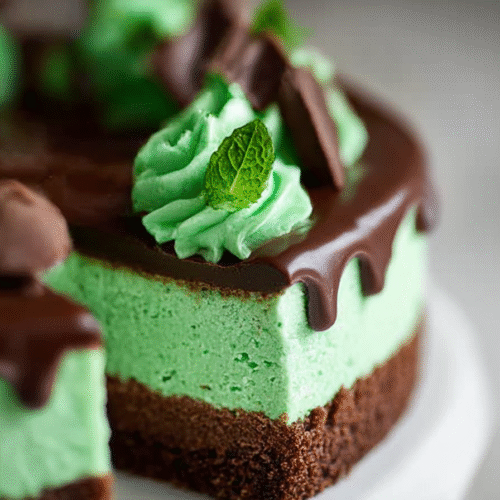
Irresistible Mint Chocolate Cheesecake – A Dreamy Dessert You’ll Crave
There’s something magical about the combination of mint and chocolate. It’s refreshing yet indulgent, light yet rich, and always a crowd-pleaser. This Mint Chocolate Cheesecake brings those flavors together in a dessert that is both visually stunning and decadently delicious. The silky smooth cheesecake base, infused with mint extract and a subtle green hue, is balanced with chunks of chocolate and topped with a glossy ganache and whipped cream. Whether you’re preparing it for a holiday celebration, a birthday, or simply because you deserve a slice of heaven, this cheesecake is guaranteed to wow your family and friends.
At Cooking with Zoe, I’ve always loved experimenting with bold flavor pairings, and mint and chocolate never fail to impress. If you’ve enjoyed my White Chocolate Raspberry Cheesecake, you’ll adore this recipe because it follows the same rich, creamy style but with a refreshing twist of mint.
Why You’ll Love This Mint Chocolate Cheesecake
- Perfect Flavor Balance – The coolness of mint pairs beautifully with rich chocolate.
- Showstopping Dessert – With its green hue, ganache topping, and whipped cream swirls, it looks as good as it tastes.
- Creamy Texture – Thanks to sour cream and heavy cream, the cheesecake filling is luxuriously smooth.
- Make-Ahead Friendly – Like all cheesecakes, this tastes even better the next day.
This cheesecake is truly a dessert worth sharing—or keeping all to yourself.
Irresistible Mint Chocolate Cheesecake – A Dreamy Dessert You’ll Crave
Ingredients
- For the Crust
- 14 regular Oreo cookies
- 8 mint Oreo cookies
- 4 tablespoons butter melted
- For the Cheesecake Filling
- 24 oz cream cheese room temperature (3 blocks)
- 1 ¼ cups granulated sugar
- ½ teaspoon salt
- 1 teaspoon mint extract
- 4 large eggs room temperature
- 1 cup sour cream
- ½ cup heavy cream
- 6 Hershey’s 1.55 oz milk chocolate bars, chopped
- 2 –4 drops green gel food coloring
- For the Ganache
- ¾ cup semi-sweet chocolate chips
- ½ cup heavy cream
- For the Whipped Cream Topping
- 1 cup heavy cream chilled
- 2 tablespoons powdered sugar
- ¼ teaspoon mint extract
- 2 –3 drops green gel food coloring
- Andes Chocolate Mints for garnish
Instructions
- Prepare the crust
- Preheat oven to 325°F (163°C).
- Pulse Oreos into fine crumbs. Mix with melted butter until evenly combined.
- Press into the bottom of a greased 9-inch springform pan. Bake 10 minutes, then cool slightly.
- Make the cheesecake filling
- In a large bowl, beat cream cheese and sugar until smooth. Add salt and mint extract.
- Beat in eggs, one at a time, mixing on low speed.
- Add sour cream, heavy cream, and food coloring until smooth.
- Fold in chopped Hershey’s bars.
- Pour batter over cooled crust.
- Bake the cheesecake
- Place pan inside a larger roasting pan and pour in hot water halfway up the sides (water bath).
- Bake 60–70 minutes, until the edges are set but the center is slightly jiggly.
- Turn off oven, crack the door, and let cheesecake sit inside for 1 hour.
- Remove, cool to room temperature, then refrigerate 4–6 hours or overnight.
- Prepare ganache
- Heat cream until steaming, then pour over chocolate chips. Stir until smooth.
- Spread evenly over chilled cheesecake. Refrigerate 30 minutes to set.
- Make whipped cream
- Beat heavy cream, powdered sugar, mint extract, and food coloring until stiff peaks form.
- Pipe swirls over cheesecake edges and garnish with Andes mints.
Notes
- For deeper mint flavor, use peppermint extract instead of mint extract.
- For easier slicing, dip knife in hot water and wipe clean between cuts.
- Store cheesecake covered in the refrigerator for up to 5 days, or freeze slices for up to 2 months.
Ingredients You’ll Need
For the Crust
- 14 Oreo cookies
- 8 mint Oreo cookies
- 4 tablespoons butter, melted
For the Cheesecake Filling
- 24 ounces cream cheese, room temperature
- 1 1/4 cups granulated sugar
- 1/2 teaspoon salt
- 1 teaspoon mint extract
- 4 large eggs
- 1 cup sour cream
- 1/2 cup heavy cream
- 6 Hershey’s 1.55 ounce milk chocolate candy bars, chopped
- 2 to 4 drops green gel food coloring
For the Ganache
- 3/4 cup milk chocolate chips (or chopped chocolate)
- 1/2 cup heavy cream
For the Whipped Cream
- 1 cup heavy cream
- 2 tablespoons powdered sugar
- 1/4 teaspoon mint extract
- 2 to 3 drops green gel food coloring
- Andes Chocolate Mints for garnish
How to Make Mint Chocolate Cheesecake
Step 1: Prepare the Crust
- Preheat your oven to 325°F (160°C).
- Crush the Oreo and mint Oreo cookies into fine crumbs using a food processor.
- Mix the crumbs with melted butter until the mixture resembles wet sand.
- Press the mixture firmly into the bottom of a 9-inch springform pan.
- Bake for 10 minutes, then set aside to cool slightly.
Step 2: Make the Cheesecake Filling
- In a large bowl, beat the cream cheese and sugar until light and fluffy.
- Add the salt, mint extract, and food coloring, mixing until smooth. Adjust the color to your preference.
- Beat in the eggs one at a time, scraping down the sides of the bowl.
- Stir in the sour cream and heavy cream.
- Fold in the chopped Hershey’s chocolate pieces.
Step 3: Bake the Cheesecake
- Pour the filling over the prepared crust.
- Place the springform pan in a larger roasting pan and pour hot water into the outer pan until it reaches halfway up the cheesecake pan (water bath method).
- Bake for 60–70 minutes, until the edges are set but the center is slightly wobbly.
- Turn off the oven, crack the door open, and let the cheesecake rest inside for 1 hour.
- Remove and refrigerate for at least 4 hours, preferably overnight.
Step 4: Prepare the Ganache
- Heat the heavy cream in a saucepan until it just begins to simmer.
- Pour over the chocolate and let sit for 1–2 minutes.
- Stir until smooth and glossy.
- Spread evenly over the chilled cheesecake.
Step 5: Make the Whipped Cream
- Beat the heavy cream, powdered sugar, mint extract, and food coloring until stiff peaks form.
- Pipe or spoon onto the cheesecake.
- Garnish with Andes Chocolate Mints for the finishing touch.
Pro Tips for Success
- Room Temperature Ingredients – Cream cheese and eggs blend better when at room temp, giving you a silky filling.
- Avoid Overbaking – The center should jiggle slightly when done; it firms up while cooling.
- Use a Water Bath – This prevents cracks and ensures even baking.
- Chill Overnight – Cheesecake flavors deepen and texture improves after resting.
Variations
- Dark Chocolate Ganache – Swap milk chocolate for dark chocolate for a bolder contrast.
- Mint Oreo Crust Only – Go all-in on the mint by using only mint Oreos for the crust.
- Mini Cheesecakes – Use a muffin tin with liners for individual servings.
- Holiday Twist – Add crushed candy canes on top during Christmas.
What to Serve with Mint Chocolate Cheesecake
- A hot cup of espresso or cappuccino.
- A drizzle of chocolate or caramel sauce for extra indulgence.
- Fresh berries for a burst of tangy sweetness.
- A scoop of vanilla ice cream if you really want to go over the top.
Storage Tips
- Refrigerator – Store covered for up to 5 days.
- Freezer – Wrap slices tightly in plastic wrap and foil. Freeze for up to 2 months. Thaw in the fridge before serving.
FAQs
Can I use peppermint extract instead of mint extract?
Yes, but peppermint is stronger, so use less to avoid overpowering the cheesecake.
Why do I need a water bath?
It creates steam in the oven, preventing cracks and helping the cheesecake bake evenly.
Can I make this ahead of time?
Absolutely! This cheesecake is best when made at least one day before serving.
Do I need to use food coloring?
No, it’s optional. The green color is fun and festive but doesn’t affect flavor.
Nutrition Facts (per slice, 1/12 of cake)
- Calories: 590
- Fat: 38g
- Saturated Fat: 23g
- Carbohydrates: 54g
- Sugar: 40g
- Protein: 8g
- Fiber: 2g
- Sodium: 320mg
Conclusion
This Mint Chocolate Cheesecake is everything you want in a dessert—creamy, chocolatey, refreshing, and impressive. The combination of mint and chocolate has timeless appeal, and when baked into a velvety cheesecake, it becomes a true showstopper. Whether you serve it at a holiday dinner, a birthday celebration, or just to treat yourself, this recipe is guaranteed to bring smiles with every slice.