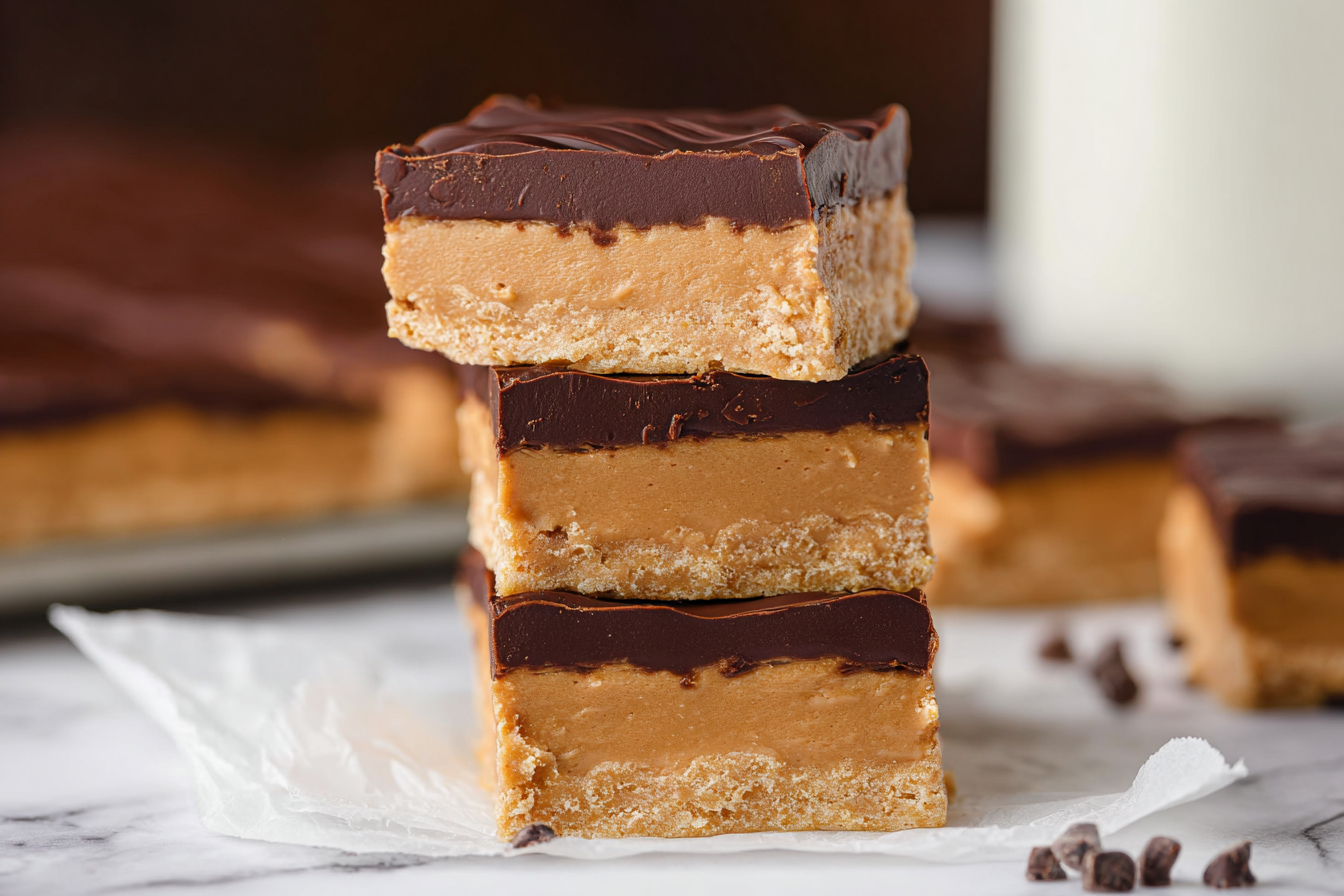
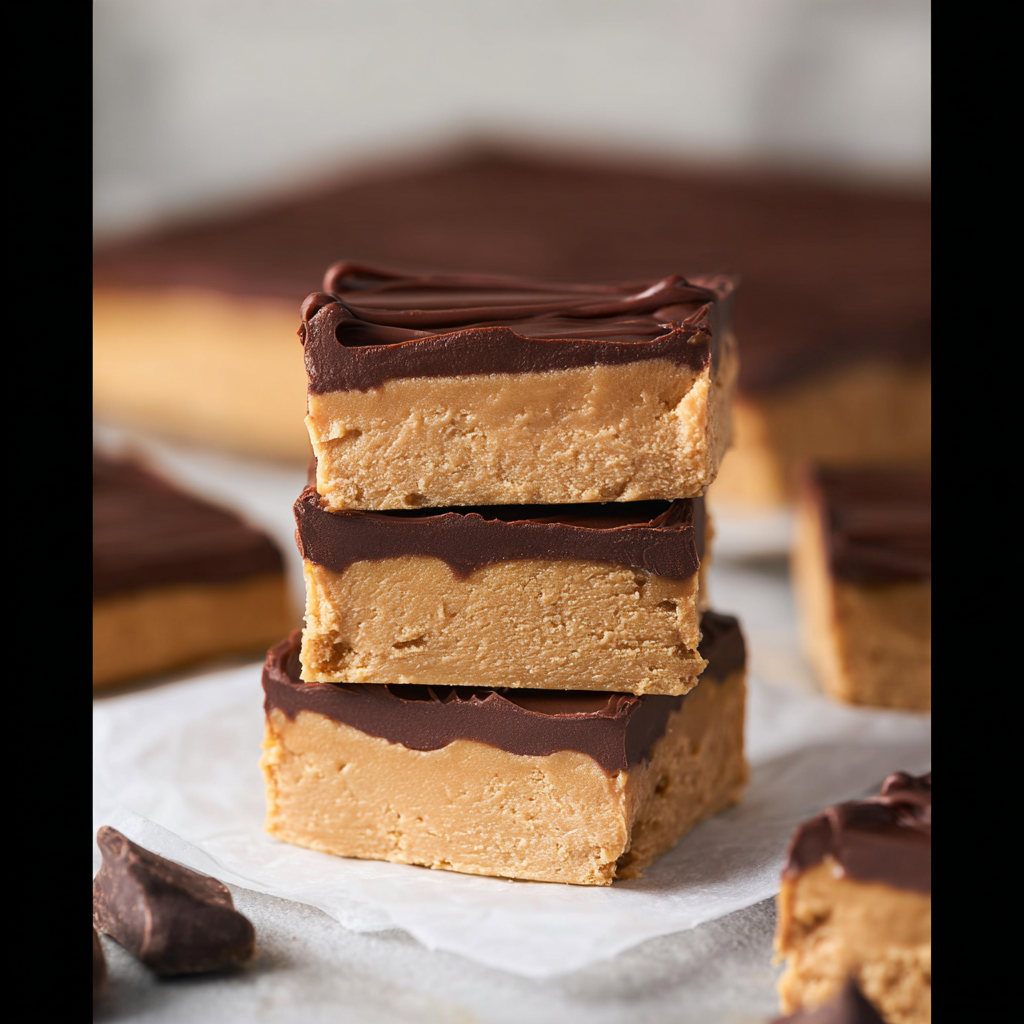
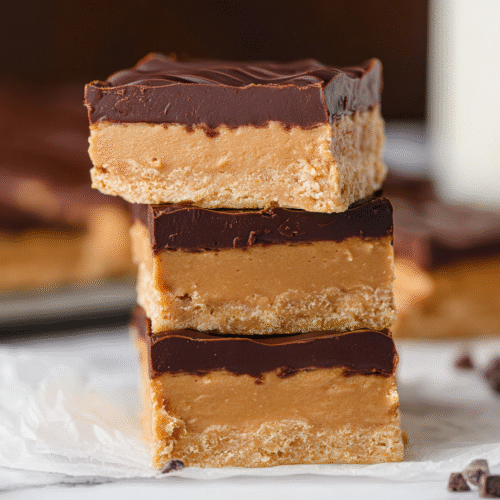
Buckeye Bars
If you’re craving a treat that’s as rich and comforting as a hug from grandma but with the indulgence of chocolate shop luxury, Buckeye Bars are your answer. With their creamy peanut butter base topped with a silky layer of chocolate, these bars strike the perfect balance between nutty sweetness and melt-in-your-mouth decadence. Trust me, you’re going to love this—every bite is worth savoring.
Behind the Recipe
Growing up in the Midwest, Buckeye candies were a holiday tradition, their little peanut butter centers dipped lovingly in chocolate. Buckeye Bars take that same nostalgic flavor and simplify it into an easy-to-make dessert that’s perfect for sharing. Instead of rolling and dipping, you get all the joy of those classic treats in a bar form that’s just as delicious and a lot less work.
Recipe Origin or Trivia
Buckeye candies, the inspiration for these bars, come from Ohio and are named after the nut from the state tree, the Buckeye. The peanut butter and chocolate treat resembles the shiny brown nut with its lighter center. Buckeye Bars are a modern twist, giving home bakers a simpler way to enjoy this Ohio classic without spending hours hand-dipping candies.
Why You’ll Love Buckeye Bars
Every dessert has its charm, but Buckeye Bars bring something special to the table. Here’s why they’ll quickly become a favorite:
Versatile: Perfect for potlucks, holiday trays, or just a sweet evening indulgence.
Budget-Friendly: Made with pantry staples like peanut butter, butter, and chocolate, they won’t break the bank.
Quick and Easy: No baking required, just mix, melt, and chill.
Customizable: Adjust the thickness of the layers, add a sprinkle of sea salt, or even drizzle with white chocolate.
Crowd-Pleasing: A guaranteed hit with kids and adults alike.
Make-Ahead Friendly: They keep beautifully in the fridge, ready for when guests arrive.
Great for Leftovers: Slice them small for quick sweet bites that last all week.
Chef’s Pro Tips for Perfect Results
The secret to unforgettable Buckeye Bars lies in the details. Here are a few insider tricks:
- Use creamy peanut butter: It gives the base a silky texture that blends seamlessly with powdered sugar.
- Line your pan with parchment: This makes removing and slicing the bars clean and easy.
- Chill between layers: Let the peanut butter base firm up before adding the chocolate so you get neat, defined layers.
- Cut with a warm knife: Dip your knife in hot water, wipe dry, and slice for sharp, bakery-style edges.
Kitchen Tools You’ll Need
Making Buckeye Bars doesn’t require fancy equipment, but a few basics will help you along the way:
- Mixing Bowl: For combining peanut butter, butter, and sugar smoothly.
- Electric Mixer: Speeds up mixing and ensures a creamy, lump-free base.
- 9×13-inch Pan: Ideal size for perfect bar thickness.
- Parchment Paper: Keeps bars from sticking and makes cleanup a breeze.
- Microwave-Safe Bowl: For melting chocolate evenly.
- Spatula: Essential for spreading both layers smoothly.
Ingredients in Buckeye Bars
Each ingredient plays a role in creating the irresistible harmony of sweet, nutty, and chocolatey flavors.
- Butter: 1 cup (softened). Adds richness and helps the base set firm.
- Creamy Peanut Butter: 2 cups. The star ingredient, giving the bars their signature flavor.
- Powdered Sugar: 3 ¾ cups. Sweetens and binds the peanut butter base.
- Vanilla Extract: 1 teaspoon. Enhances the flavor with a warm note.
- Semi-Sweet Chocolate Chips: 2 cups. Melted to create the glossy top layer.
- Butter (for chocolate): 2 tablespoons. Ensures the chocolate topping is smooth and easy to cut.
Ingredient Substitutions
Sometimes your pantry runs short, but don’t worry—there are easy swaps.
Peanut Butter: Almond butter or cashew butter for a different nutty twist.
Semi-Sweet Chocolate Chips: Dark chocolate for a richer bite or milk chocolate for extra sweetness.
Powdered Sugar: Blend granulated sugar in a food processor until fine.
Ingredient Spotlight
Peanut Butter: The creamy, nutty heart of Buckeye Bars. Its smooth texture and savory notes balance perfectly with the sweetness of sugar and chocolate.
Chocolate Chips: They’re not just a topping but a silky, melt-in-your-mouth layer that ties the whole dessert together.
Instructions for Making Buckeye Bars
Making Buckeye Bars is a joyful process, one that fills your kitchen with the comforting aroma of peanut butter and chocolate. Let’s dive in step by step:
- Preheat Your Equipment: No oven needed, but line a 9×13-inch pan with parchment paper for easy removal.
- Combine Ingredients: In a large bowl, beat softened butter, peanut butter, powdered sugar, and vanilla until smooth and thick.
- Prepare Your Cooking Vessel: Spread the peanut butter mixture evenly into the prepared pan, pressing it firmly into place. Chill for 20 minutes.
- Assemble the Dish: In a microwave-safe bowl, melt chocolate chips with 2 tablespoons butter, stirring until silky smooth.
- Cook to Perfection: Pour melted chocolate over the chilled peanut butter base, spreading evenly with a spatula.
- Finishing Touches: Chill in the fridge for at least 2 hours until firm.
- Serve and Enjoy: Lift parchment to remove bars from pan, slice into squares, and enjoy the sweet peanut butter-chocolate harmony.
Texture & Flavor Secrets
The magic of Buckeye Bars lies in their contrast. The bottom layer is dense, nutty, and slightly crumbly, while the top layer is smooth, glossy, and melts instantly on the tongue. Together, they create a satisfying bite where sweet, salty, and bitter notes dance in harmony.
Cooking Tips & Tricks
Here are some handy tips to make the process even easier:
- Cut bars straight from the fridge for cleaner edges.
- Add a sprinkle of flaky sea salt on top for a gourmet touch.
- Double the recipe if serving a crowd—they disappear fast!
What to Avoid
Even simple recipes have pitfalls. Here’s how to avoid them:
- Don’t use natural peanut butter, as the oils can separate and make the bars greasy.
- Avoid overheating the chocolate, which can cause it to seize and turn grainy.
- Don’t skip chilling time, or the layers will smudge together when cutting.
Nutrition Facts
Servings: 24 bars
Calories per serving: 285
Note: These are approximate values.
Preparation Time
Prep Time: 20 minutes
Cook Time: 0 minutes
Total Time: 2 hours 20 minutes (including chilling)
Make-Ahead and Storage Tips
Buckeye Bars are fantastic for prepping ahead. Make them up to 3 days before serving and keep refrigerated in an airtight container. They also freeze beautifully—just wrap tightly and freeze for up to 2 months. Thaw in the fridge overnight before enjoying.
How to Serve Buckeye Bars
Serve these beauties chilled for the best texture. They pair wonderfully with a tall glass of cold milk, a hot cup of coffee, or even crumbled over vanilla ice cream for an indulgent sundae twist.
Creative Leftover Transformations
If you find yourself with extras (unlikely, but possible), here’s how to reinvent them:
- Crumble into milkshakes for a peanut butter-chocolate explosion.
- Use as a topping for brownies or cupcakes.
- Break into chunks and mix into homemade ice cream.
Additional Tips
For an extra layer of indulgence, drizzle melted white chocolate over the top before slicing. Or, press crushed pretzels into the chocolate layer for a salty crunch that takes these bars to the next level.
Make It a Showstopper
Presentation matters. Slice Buckeye Bars into neat, uniform squares and arrange them on a tiered dessert stand. A sprinkle of cocoa powder or edible gold dust can make them sparkle at parties and holiday gatherings.
Variations to Try
- Peanut Butter Swirl: Marble the chocolate layer with extra peanut butter for a stunning design.
- Dark Chocolate Lovers: Use bittersweet chocolate for a sophisticated edge.
- Crunchy Base: Stir in crushed graham crackers or pretzels to the peanut butter mixture.
- Holiday Twist: Add a pinch of cinnamon or nutmeg for seasonal warmth.
FAQ’s
Q1: Can I make Buckeye Bars without powdered sugar?
Yes, but powdered sugar helps with texture. If unavailable, make your own by blending granulated sugar until fine.
Q2: Do I need to refrigerate Buckeye Bars?
Yes, chilling keeps them firm and easy to cut.
Q3: Can I use natural peanut butter?
It’s not recommended, as the oil separation can affect texture.
Q4: How long do Buckeye Bars last in the fridge?
Up to 1 week when stored in an airtight container.
Q5: Can I freeze Buckeye Bars?
Absolutely. Wrap tightly and freeze for up to 2 months.
Q6: Can I make them dairy-free?
Yes, use vegan butter and dairy-free chocolate chips.
Q7: What size pan works best?
A 9×13-inch pan gives the ideal thickness, but you can use an 8×8 for thicker bars.
Q8: How do I cut neat squares?
Chill thoroughly and use a warm knife for clean cuts.
Q9: Can I add toppings?
Yes, sea salt, crushed pretzels, or a drizzle of white chocolate work beautifully.
Q10: Are these gluten-free?
Yes, as long as your ingredients (like chocolate chips) are certified gluten-free.
Conclusion
Buckeye Bars are the perfect marriage of nostalgia and indulgence, bringing the beloved Ohio treat into an easy-to-make bar form. With their creamy peanut butter layer and glossy chocolate topping, they’re a dessert worth making again and again. Whether you’re baking for family, friends, or just yourself, these bars are sure to become a favorite—one bite and you’ll see why.
Buckeye Bars
Ingredients
- 1 cup 226 g unsalted butter, melted
- 2 cups 500 g creamy peanut butter
- 2 cups 240 g powdered sugar
- 2 cups 200 g graham cracker crumbs (about 16 sheets, finely crushed)
- 2 cups 350 g semi-sweet chocolate chips
- 2 tablespoons 28 g unsalted butter
Instructions
- Prepare the pan: Line a 9×13-inch baking pan with parchment paper or lightly grease it.
- Make peanut butter layer: In a large bowl, mix melted butter, peanut butter, powdered sugar, and graham cracker crumbs until smooth. Spread evenly into the prepared pan and press down firmly.
- Melt chocolate topping: In a microwave-safe bowl, combine chocolate chips and butter. Heat in 30-second intervals, stirring after each, until smooth and fully melted.
- Add chocolate layer: Pour the melted chocolate mixture over the peanut butter base, spreading evenly with a spatula.
- Chill: Refrigerate for at least 2 hours, or until chocolate is set.
- Cut and serve: Slice into bars using a sharp knife. Serve chilled or at room temperature.
Notes
- For best results, use creamy peanut butter (not natural, as it separates).
- Store bars covered in the refrigerator for up to 1 week or freeze for up to 3 months.
- To cut clean slices, warm your knife under hot water and wipe between cuts.